BMW's V-12 hydraulic camshaft chain tensioner contains an O-ring that hardens
over time and allows oil to seep past the O-ring and out through the
tension adjustment screw threads. This results in small puddles of oil
on the garage floor and an oil-soaked A/C compressor and drive belt.
This slow leakage does not affect the operating performance of the
tensioner.
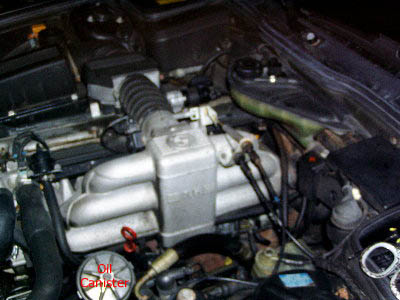
The tensioner is located on the right front of the
engine, directly above the A/C compressor. Most tensioners still have
their “anti-tampering” cap in place, a black cylindrical plastic cap to
protect the adjustment screw from damage. Oil typically weeps along the
adjustment screw and exits the tensioner at the end of this cap, which
is open. Some tensioners have their protection cap missing, exposing
the adjustment screw and lock nut.
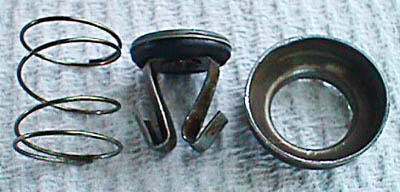
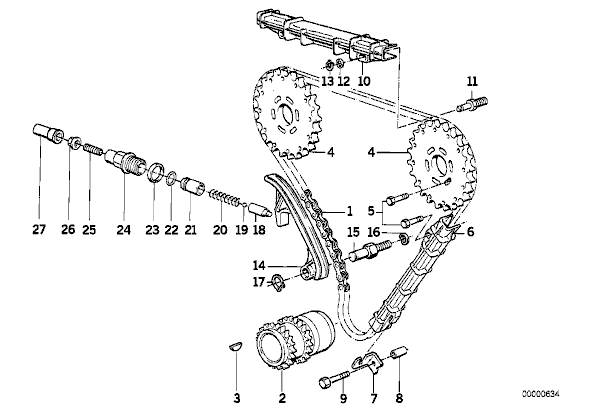
1. Tension set screw
2.
Set screw lock nut (17mm)
3. Screw plug (19 mm)
4.
Aluminum crush sealing ring (07 11 9 963 355)
5.
Dowell sleeve O-ring (11 31 1 702 953)
6. Dowell sleeve
7. Spring
8. Piston
You'll
need to purchase items 4 and 5 above, and also the anti-tampering cover
(11 31 1 720 006), which is not shown. You also need 17mm and 19mm deep
sockets and a torque wrench calibrated up to 50 NM.
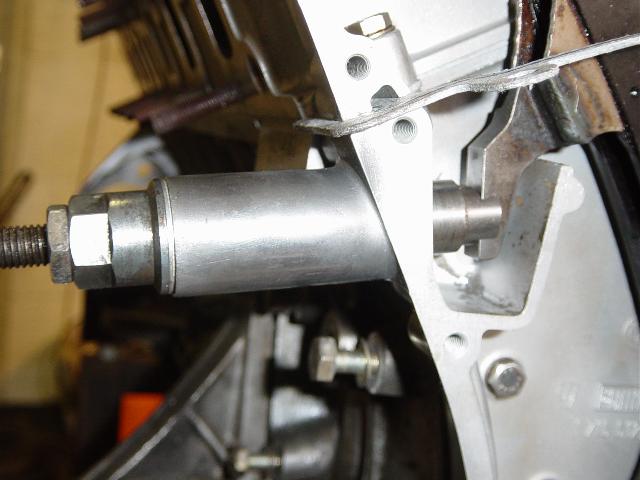
The picture
below shows the location of the tensioner cap assembly on the engine,
just forward of the air conditioning compressor on the right, front,
lower section of the engine.
To gain access, remove the intake mass
airflow sensor and rubber ducting between the air cleaner housing and
the DK motor assembly. Also, disconnect the high tension lead from the
coil and carefully put aside. You'll need to remove the protection cap
(item 1 below left) by vigorously wiggling from side to side. It can't
be reused, so don't worry about damaging it.
Next, take your 17mm
socket and release the tensioner set screw locknut (item 2 above).
Leave it loose on the set screw (item 1) and give the set screw
precisely 1 counterclockwise turn to release a tiny bit of pressure off
the tensioner piston. Don't disturb the set screw any further, and
gently snug the lock nut back down onto the screw plug (item 3).
Next,
get your 19mm deep socket, fit over the screw plug, and giving a mighty
heave, unscrew the plug. Do not release the plug entirely from the
cylinder block. The piston inside is under considerable pressure and
will definitely damage hands if you're not prepared to press against it
when the screw threads release. Slowly unscrew the plug. When it
releases, a capful of oil will drain from the tensioner piston all over
the floor, so be prepared to catch it. Once free, you might have to
extract the piston (item from the bore by fishing around with your
little finger.
Now, using an Exacto knife, carefully nick and pry at
the O-ring (item 5) on the dowell sleeve (6). Do not scratch or
otherwise damage the dowell sleeve. The O-ring will be very hard and
sealed in its groove. Once free, clean the groove, replace the O-ring,
and replace the crush ring (item 4) on the screw plug.
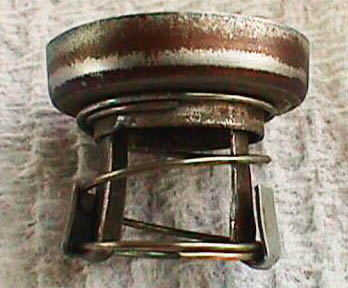
Now, time to
assemble everything. Insert the piston into the bore with the end of
your little finger, and press and rotate until you feel the end of the
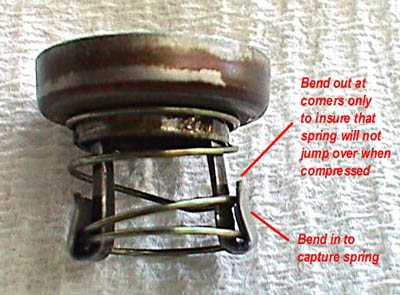
piston "key" into the tensioner ramp. Here's a picture of the piston
engaging the ramp below on the left in item 1.
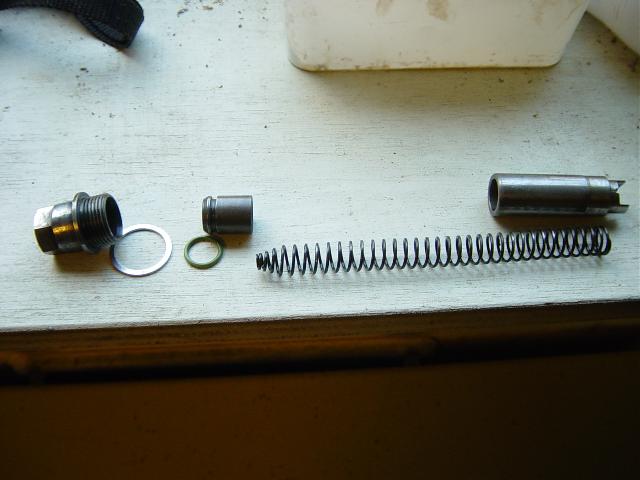
Now comes the hard
part. Seat the narrow end of the spring (7) into the dowell sleeve (6),
and seat the sleeve into the screw plug (3). I then put the screw plug
into my 19mm socket, guided the spring into the back of the piston, and
tried repeatedly to compress the spring enough to allow the screw plug
to engage a thread on the cylinder block. It's really tough, so take
your time. You'll get the hang of it after about 10 minutes. Once
you've got it threaded, torque the screw plug down with 40 NM.
Next,
turn the set screw 1 turn clockwise to restore the original tension
setting, and tighten the 17 mm set screw (2) down with 20 NM torque (my
guess - it's not in the specs). Place the protection cap on the set
screw and wiggle it snug onto the screw plug.
Because you've drained
a small catch reservoir the tensioner uses to feed oil to the piston,
the tensioner will need to be primed. If the right camshaft cover is
off, you can pour a small amount of oil down the right side of the
camshaft front cover, where it will fill the reservoir. Then insert a
long screwdriver (I used a wood paint mixing blade) and depress and
release the tensioner ramp repeatedly until it becomes resistant to
movement (see the A-B diagram above).
If you don't have the covers
off and the tensioner ramp accessible, I've been told the following
works pretty well. Set the OBC antitheft CODE feature of your car to
disable the ignition, crank the engine three times for 10 seconds each
time, and then disable the CODE feature to allow the engine to fire.
You'll probably hear a lot of chain slap for the next 30 seconds while
the reservoir fills and the tensioner piston primes. Degree of
difficulty: 5 on a scale of 10.
from the ever helpful Johan & Sean's site
This is without the anti-tamper cover
Jump to top |